The classic way to build a balsa wing is to put some kind of protective plastic sheet on your plan and build the wing right on top of the plan, pinning parts to your building board as you go. This usually works well and is very easy because lots of planes have ribs with a totally flat bottom or with at least part of the bottom flat. As long as your plan is accurate, the wing will be exactly the right size and shape because you’re building it right on top of the drawing. Even if your wing ribs are curved on the bottom surface you can still build directly on top of the plan by using shims to hold up the trailing edge so the wing stays “flat” on the board. Using this method, it is easy for the wing ribs to drift around and cause warps.
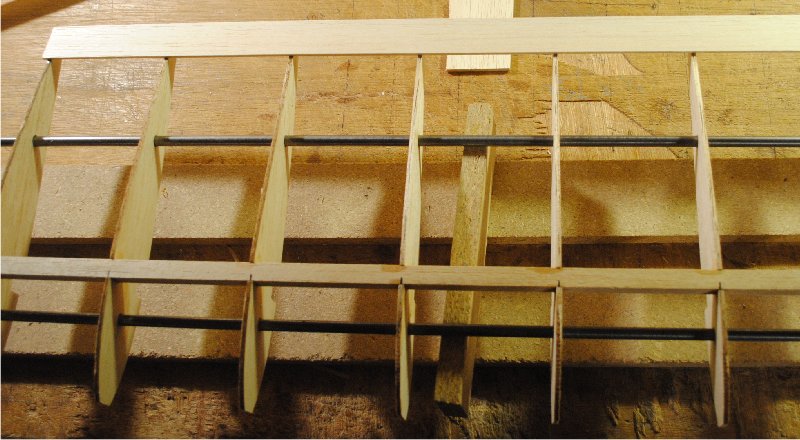
There is another way to build a wing with non-flat ribs, using a wing jig. The first thing you need is a set of ribs with quarter inch holes in them.
Thread half of the ribs onto the wing jig rods. Make sure they are upside down. This isn’t an issue with accurately cut symmetrical ribs of course. But if your ribs are semisymmetrical, figure out which way is up and put them on the jig upside down.
Measure the rib spacing on the plans and mark the rib locations on your spars and trailing edge.
Check that the rods are straight and your ribs are square, then spread the ribs out to the proper spacing.

Attach the trailing edge first, but don’t attach the root rib yet. Note the alignment to the marks.
Make sure the ribs are square and attach the spar, but don’t glue the root rib yet.
Next, add the trailing edge sheeting.
Then add the leading edge sheeting.
Remove the rod clamps, turn the wing over, and clamp it back down. Insert the top spar in the spar notches. Align the ribs with the marks on the spars, except the root rib, and glue them in place. Use your dihedral gauge to set the angle of the root rib and glue it to the spars, sheeting, etc.
Now attach the leading edge and trailing edge sheeting. Sand the leading edge sheeting flush with the ribs and add the leading edge stick. As long as the wing is in the jig it is flat and straight. Add the shear webs to the spars.
Now that you have the top and bottom, and the leading edge, and the shear webs attached, the wing is rigid and resistant to twisting. Remove the clamps, pull the rods out of the wing, and you’re finished with the wing jig.
For those of you who are wondering why I start with the wing upside down and then turn it upright, and why I don’t glue the root rib in place until later, there’s a good reason for that. Imagine that your wing is upright to start with, and you glue the root rib to the trailing edge, then you add the top sheeting and set the dihedral angle on the root rib and glue it in place. When you prepared your spars you made four spars the same length, right? Now you flip the wing over and try to add the bottom spar but it’s just a hair too short. That’s why you should start with the wing upside down and attach the bottom sheeting first, because everything on the bottom is longer. When you flip the wing over, the sheeting and spar for the top will be a little bit too long, and that’s never a bad thing.


