
Having nice tools is a good thing, but it doesn’t take a lot of fancy tools to build a balsa airplane from scratch. This is especially true if you’re building a simple airplane, which is convenient because that’s what you would typically start with. So build yourself a simple plane with simple tools, then buy tools as needed for building the more challenging designs as you go along.
There are a few basic items that are generally considered essential to any balsa builder’s toolbox. You can build a plane and do a good job with nothing more than a flat surface and what’s shown in this photo. Don’t be afraid to start small.
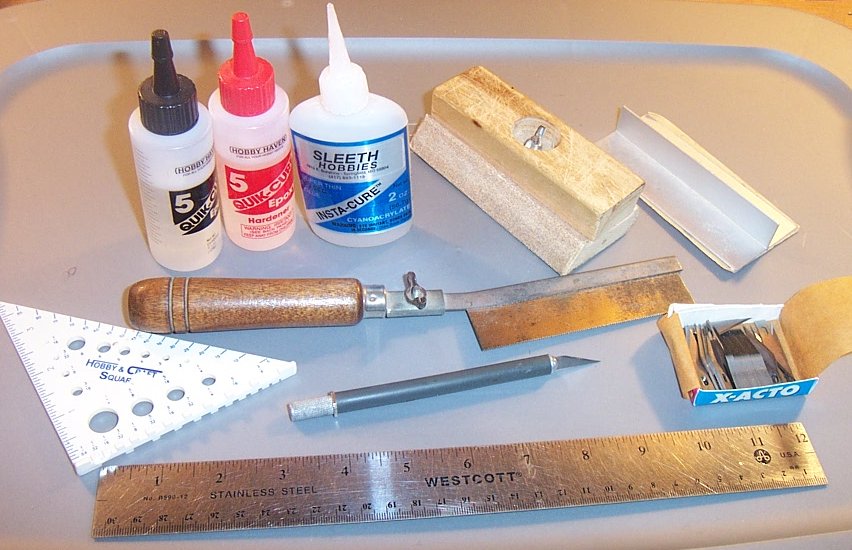
First and foremost is the X-Acto knife, more specifically a #11 blade and holder. There’s no sense fooling around when it comes to this basic tool. Get a knife handle like the one in the photo, where you turn the end of the handle to clamp the blade instead of turning the part right next to the blade. This knife also has a six sided collar that keeps it from rolling off the table. If you can imagine yourself enjoying this hobby for a long time in the future, go ahead and get a box of a hundred #11 blades.
The X-Acto knife’s best friend is a metal ruler. There’s not much to say about that other than you won’t regret getting one.
The next most basic tool is the sanding block. You can build a plane with just sandpaper, but when you get a block you’ll wonder how you ever built anything without it. You can see two blocks in the photo, a wooden one that uses a quarter sheet, and an aluminum one that uses adhesive strips. They’re both good.
One of the greatest innovations ever made in model building is cyanoacrylate (CA) glue. It allows you to build a good straight airplane without even pinning anything to the table. Most things I build in .20 size and smaller don’t involve any adhesive other than CA. Realistically, both CA and epoxy are stronger than the materials they are applied to, so don’t sweat it. CA sometimes has a hard time penetrating into hard plywood, so I tend to use epoxy there. I recently started using good old fashioned Titebond Original, and I like it. I built a Cloud Dancer with about 60% Titebond and 40% CA. It’s cheap and a bottle of it lasts a long time.
Of course you’ll also want a square. For my first 12 years of building airplanes I used CD cases, but I just recently discovered something even better: an expired debit card. I wish I had been using these all along. They’re small enough to fit into tight spaces, and the corners are rounded. You might not think of it at first, but rounded corners are quite convenient. The square in the photo is a pretty nice little unit. You can get them in hobby stores, and they even have balsa thickness and wire size gauges built in.
The other thing you really need is a saw to cut plywood bulkheads. If you build only square airplanes to start with you can use a razor saw like the one in the photo, but as soon as you build a plane with a rounded top deck you’ll need a coping saw or power scroll saw to cut out a firewall and bulkheads.
The only other truly necessary tool for building a plane is a drill. Mine was a bit large for the photo, so you’ll have to use your imagination. (You know what a drill looks like, right?) Anyway, you’ll need one.
Once you officially become an airplane building enthusiast, you’ll want to expand your tool collection. Here’s my best bet for your second stage tool list.

Whoa! Hold everything. I got tired of the shortcomings of my little blue razor plane shown in the above photo, so I did a little bit of research and ended up buying the Stanley 12-101 wood plane. This is a really nice little unit that I recommend highly, and the price is very affordable. Use it for trimming off big strips of wood from the leading edges of wings and control surfaces before moving on to a sanding block. This saves tons of effort and sandpaper. Here’s what the Stanley looks like. You should get one.

The Dremel tool should be pretty high on your list. I don’t use mine for much besides cutting off landing gear wire and drilling 1/16″ holes for servo mounting, but I wouldn’t want to do without it. Now that I think about it, I also use it for installing strip ailerons, elevator joining wire, and probably a few other things….
You would think that instant glue is fast enough, but sometimes accelerator comes in really handy.
Foot-long drill bits are more useful than you might expect, especially for wing mounting holes.
The strange looking tool next to the planer is a T-pin pusher. My preference for a building board is a hollow core door, and this tool is the best way to push those pins into the semi-hard surface. It has a magnet in it for holding the pin, and little slots for pulling them back out.
If you’re going to build balsa airplanes and you want to buy a really useful tool, get a power scroll saw. A lot of guys use them to cut out wing ribs, and you just can’t beat it for cutting out plywood parts. But the point of this article is to assure you that you really don’t need a lot of fancy gear if you want to try your hand at building a plane. Believe it or not, when I built my first airplane kit I had only a very old X-Acto knife with one blade, a bottle of glue, and a piece of sandpaper with no block. I used my mother’s clothes iron to install the covering film. Just start small and work your way up. You can do it, and it’s a lot of fun!