
Lots of kits have pre shaped leading edges for the wings, and some balsa suppliers sell pre shaped leading edges for your scratch built wings. But most of the time the leading edge is shaped from a square stick.
Rule number 1 for shaping leading edges, and for sanding most other parts of your airplane, is to use a sanding block. Do not try to do this kind of work with a piece of sand paper in your bare hand. It just won’t get the job done. Hand held sandpaper will cut softer balsa more easily, leaving harder balsa and glue joints protruding. A hard, flat block acts as an equalizer so you can sand to the shape that you really want. Also, you need good sharp sand paper. The harder you work at sanding, the more strain you put on the structure because there’s a lot of action but not much cutting going on. I always do rough shaping with 120 grit and finish with 180 if I’m feeling fancy. Most times I finish with 120 because it produces a finish good enough to be covered with Monokote. Other types of finish require a finer grit for final sanding. A real perfectionist will use 220, then 400 and get the whole plane silky smooth no matter what kind of finish is to be applied, but I’ll leave that up to you. I’m just telling you not to beat the thing to death with dull paper when you’re doing the major shaping.
Speaking of reducing strain on the structure, try not to set your two hands up as the rock and hard place that the plane will be crushed between. If you have a wing with delicate ribs, no sheeting, and very firm leading edge sticks, you will put the structure at risk if you just sort of grapple the whole wing with one hand while you go at the hard leading edge with a sanding block. In such a case your wing will be less likely to break if you hang onto the leading edge with one hand while sanding the same leading edge with the other hand.
Now that we have that out of the way, let’s get to the project at hand. You could go at it with sand paper immediately, but it makes more sense to start with a planer. Don’t wear out your sand paper on balsa that you could get off with a blade. Get close to the finished shape, but don’t get carried away and take too much off.

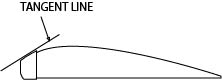
Next we switch over to the sanding block. Envision the final shape and imagine a tangent line that contacts the curve of the airfoil where the leading edge stick meets the ribs or rib sheeting. Obviously you should never tip your sanding block farther back than this line, because that would flatten the ribs.

This is what it’s supposed to look like when it’s finished, but it doesn’t look like that yet. At the beginning it looks more like this.
Notice that I kept the tangent line parallel to the one in the original diagram. This is because you should imagine the tangent line and sand the leading edge at that angle and stop when you reach the ribs or rib sheeting. Naturally, you should start with the block at the same angle you intend it to be at when you’re finishing. Sand the entire length of the wing at this angle.

I always move the block in a circle, rather than back and forth. Do not change the angle of the sanding block. Sand until you just touch the ribs or rib sheeting. Start at one end, and continue until you reach the other end and it all looks the same, with one facet sanded into the stick.

Here’s what it looks like from the end. I also sanded the bottom flat to match the bottom of the wing.

This was pretty easy because it’s a flat bottom airfoil. If this were a Clark Y or a symmetrical airfoil you would sand the bottom the same way that the top was done.
At this point you can see how you really don’t need to take much off to achieve a smooth curve. In the case of the wing in my photos you could simply take off the corner, making little circles with the sanding block and rocking it back and forth around the curve, while moving from one end to the other. This would make a finished curve pretty easily. Here’s the result:

If you have a bigger stick or a thicker airfoil, then you should approach it a bit more systematically. Imagine another tangent line, preferably at the apex of one of the front corners of the stick, and sand another facet into the stick without rocking the block, all the way from one end to the other. You could do this on the top and the bottom.
![]()
At this point it’s bound to be very close to the final shape. Now go to each protruding corner, make little circles with the block, and rock the block around the curve as you go from one end of the wing to the other.