|
ARTICLES
HomeGet started building with these basic tools An easy, great looking color layout for maximum visibility Build swept back wings to avoid tail heaviness Install your wings with bolts when the plans show rubber bands How to build a straight fuselage without using a jig How to build a simple cowl out of balsa blocks Fixing construction mistakes How to get longer run time from a Cox engine by using a remote tank Compatibility of various paints and finishing materials Propeller selection guide for 2 stroke and 4 stroke glow engines Store robbie@balsaworkbench.com MY OTHER WEBSITES Jensen Speaker Dealer Harmonica amplifiers with classic blues tone |
If
you look at different model airplane building plans you will see
several different ways to build engine cowls. One of the easiest
ways
of all is to stick blocks of balsa wood on the front of the plane and
carve them to look like an engine cowling. A few years back I
acquired
a large quantity of balsa blocks, and ever since then almost every
plane I build has this kind of cowling.
I chose what I think is a much easier way to build my Basic Trainer, which is where the engine is attached to a Dave Brown mount screwed to the firewall with blind nuts and 4-40 screws. This way I don’t have to mess with carving a pair of curved hardwood beams. To build the cowling I used a block of balsa and two
pieces of
1/4″
sheet balsa. All I needed to know to start with was how
thick the
block should be to go from the bottom of the plane to the bottom of the
engine mount, as well as how long it should be to almost reach the back
of the propeller. As you can see in the following photos, I
needed a
1.5″ thick block just a little less than 3″ long.
Once I had the dimensions, I cut a suitable block and
drew a
centerline on it. (Making sure that the cut is nice and square is
always a good idea.) I stuck it to the firewall with 5 minute
epoxy.
Then I attached the engine to the firewall and held up one of the 1/4″
cheeks to find where it would need to go to accommodate the width of
the engine. I drew a line on the inside edge of this sheet, then
duplicated the line on the other side of the centerline.
 After you have these parts in place, you’ll need to mount the engine again momentarily and glue a few scraps inside the front of the cowl to bring it closer to the crankshaft. My scraps were about an inch long, and I placed them so that the grain was running in the same direction as the big pieces. Unfortunately, I forgot to take a photo of this step…. But I did take a photo of the next step, which is where
I
carved the
sides of the blocks away so they would follow the contours set by the
sides and bottom of the airplane.
Here’s the front end after rough carving.
Here it is at the same stage, from another angle.
After I carved the rough shape, I sanded the sides and bottom of the cowl to exactly match the contour of the fuselage sides and bottom. This step takes a little bit longer, but it’s still not difficult. Notice that my cowl still has a sharp edge to it. I sanded a simple curve on the right, a simple curve on the left, and a simple curve on the bottom. Think of it as a basic 3-view drawing, but don’t put in any compound curves yet or you’ll get off track and end up with a cowl shaped like a potato.
Here’s another view of the same step. Notice that
you
can also
see
the scraps placed in the nose to close in the space around the
crankshaft.
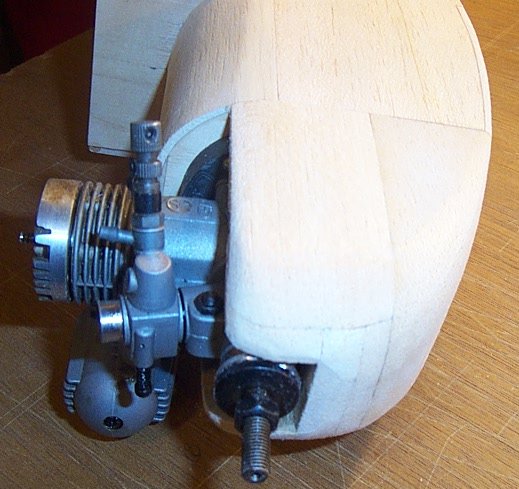
Next I put the engine back in place to make sure
everything
was
lining up OK. Still no compound curves yet. This step is
very
important because it’s where you make sure everything is symmetrical.
OK, now it’s time to sand those sharp corners off to make nice compound curves. I used a block to take the major portion off, and then I used a sandpaper sheet with my bare hand to smooth everything out. Also, I trimmed the top edge of the inner nose filler scraps at this point, to smooth them out a bit. You can see that in the photo, just under the needle valve.
Here’s what it looks like from the bottom.
|
 Here is the plan for the